
Footing Options keeps your quotes to the footing and soil types your company actually uses. A company admin sets your footing types, soil types and sizes, the defaults, and whether your team can change them per shed. Every shed is then designed within those options, and engineering suggests footing sizes from them. Set it up to match the footings you build with.
The short version
- Company admins only: Settings, then Footing Options
- Turn on the footing types and soil types you use
- Choose whether your team can change them per shed, and set the defaults
- Switch on the pier and pad sizes you use, set their depths, then click Save
Who can change it
Only company admins see the Footing Options tile in Settings. It reads "Choose the footing types, soil types and sizes your company uses." If you can't see the tile, ask your company admin.
Set up your Footing Options
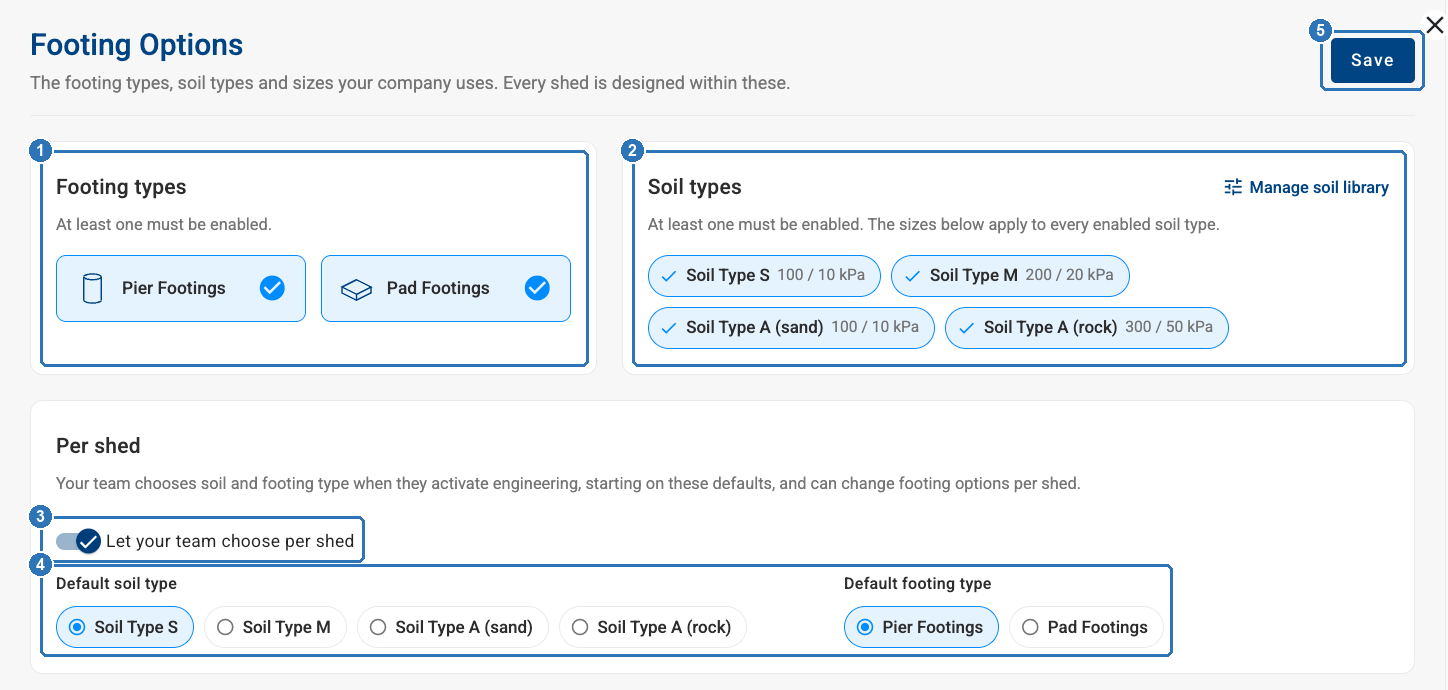
- In ShedMate, click Settings, then the Footing Options tile.
- Under Footing types (1), turn on Pier Footings, Pad Footings or both. At least one must be on.
- Under Soil types (2), turn on the soil types your sites have. At least one must be on.
- Decide whether to Let your team choose per shed (3), then pick a Default soil type and a Default footing type (4).
- Under Pier Footings and Pad Footings, switch on each size you use and set its Min and Max depth.
- Click Save (5).
What each setting does
| Setting | What it does |
|---|---|
| Footing types (1) | The footing types your company builds: Pier Footings, Pad Footings, or both |
| Soil types (2) | The soil types your team can design for, each shown with its kPa values. The sizes you set apply to every soil type you turn on |
| Let your team choose per shed (3) | On: your team chooses the soil and footing type when they activate engineering, starting on your defaults, and can change footing options per shed. Off: each shed uses your defaults |
| Default soil type and Default footing type (4) | The soil type and footing type each shed starts on |
Pier and pad sizes
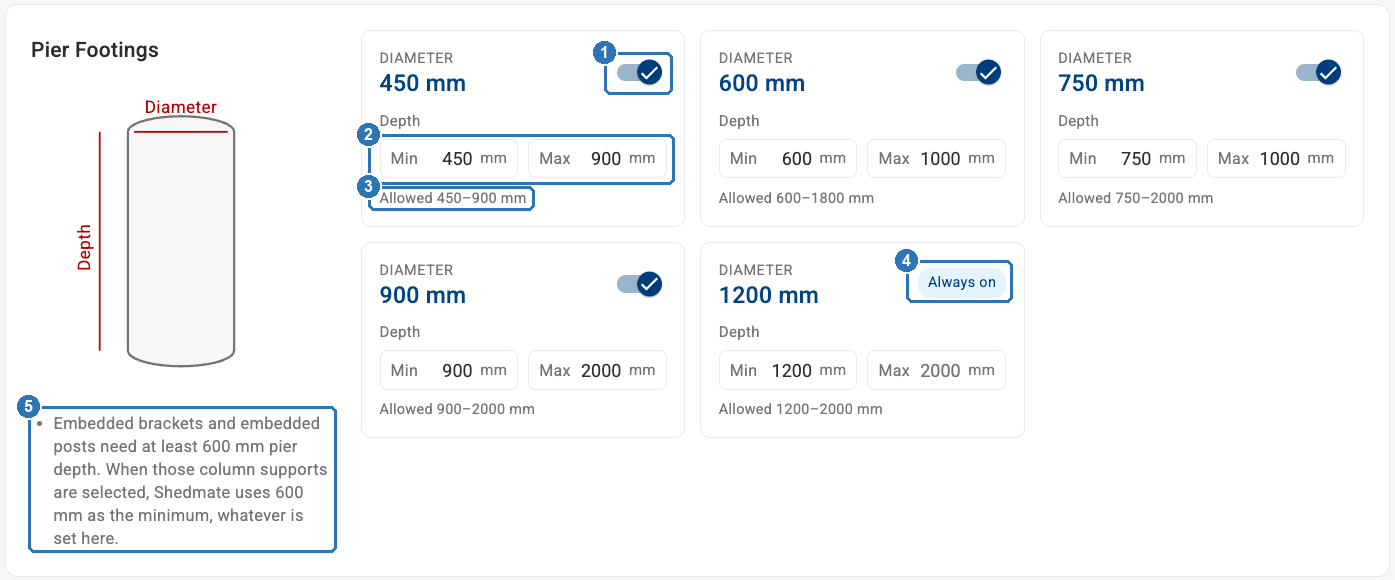
Each size has its own switch (1). Set the shallowest and deepest footing your team can use in Min and Max (2), within the Allowed range on the card (3). The largest size is Always on (4).
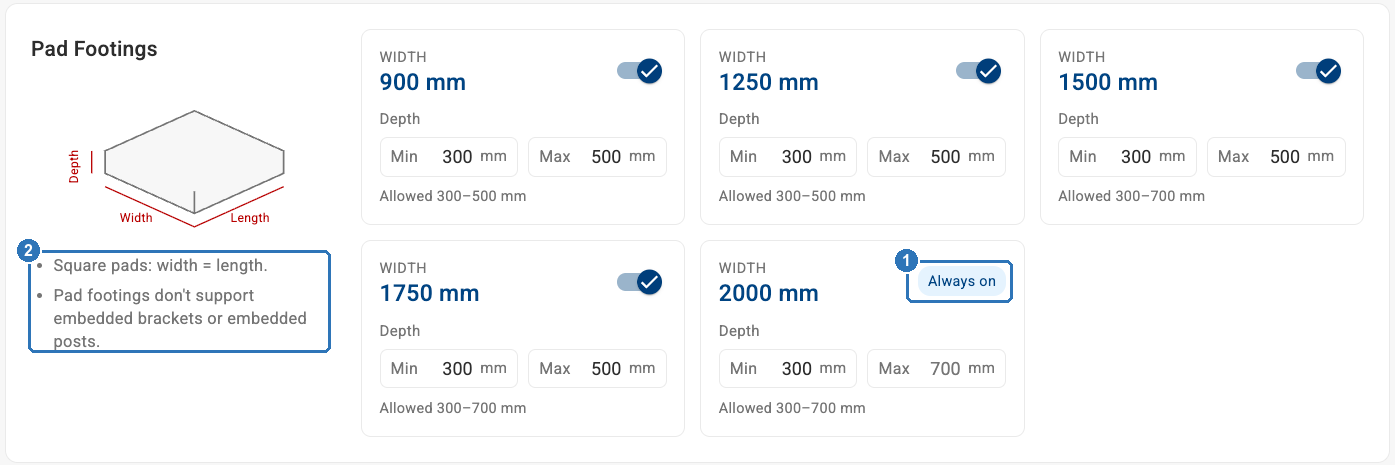
| Pier Footings | Pad Footings | |
|---|---|---|
| Sizes | Diameters of 450, 600, 750, 900 and 1200 mm | Square pads, 900, 1250, 1500, 1750 and 2000 mm wide |
| Allowed depths | 450 mm: 450 to 900 mm. 600 mm: 600 to 1800 mm. 750 mm: 750 to 2000 mm. 900 mm: 900 to 2000 mm. 1200 mm: 1200 to 2000 mm | 900 and 1250 mm: 300 to 500 mm. 1500, 1750 and 2000 mm: 300 to 700 mm |
| Always on | 1200 mm | 2000 mm |
| Embedded brackets and embedded posts | Need a pier at least 600 mm deep. When they're selected, ShedMate uses 600 mm as the minimum, whatever is set here (5) | Not supported on pad footings (2) |
What your team sees on each shed
With Let your team choose per shed on, your team picks the soil type and footing type in the Ground step when they activate engineering on a shed. Both start on your defaults.
How engineering uses your options
Engineering suggests footing sizes within your options. If some footings need a review by our team, ShedMate tells you. For tougher sites, the largest sizes stay on: 1200 mm piers down to 2 m deep, and 2000 mm pads.
Changing footings on an engineered shed
You can change the footings on an engineered shed. Each footing is colour-coded by the footing check, so you can see when a choice needs attention. When engineering is applied, your footing changes can be kept or reset. Some changes are reset by design, so check your footings each time engineering is applied.
If a shed's footings are set to align with the slab, ShedMate warns you before you request engineering.
Footing Options doesn't replace engineering review. Engineering is still reviewed and certified by our engineering team, as it is today. Your options set what your team designs with; they don't certify a footing. Plans you export before certification aren't certified, and ShedMate engineering covers the shed's footings, not the slab.
When to contact us
- The site is highly reactive or a problem site (for example class H, E or P). Ask us for custom engineering before you quote.
- You have a soil test. Email it to engineering@shedmate.com.au with the job number when you request engineering.
- You need a footing size or soil type that isn't on the page, or you're not sure which sizes to turn on. Email support@shedmate.com.au and we'll go through your Footing Options with you.
Related articles
- Does ShedMate engineering cover my slab, footings and soil test?
- What do I get with ShedMate engineering, and what's covered?
- What does my engineering status mean, and what do I do?
- Why can't I use a bolt-down base bracket on larger columns?
Stuck? Email support@shedmate.com.au with your company name and a screenshot of your Footing Options page.