Shedmate Just Got Better: Customisation Tools, Pricing Controls, Cladding & Fascia Options, Adjustable Dimensions, Conditional Pricing, View-Only Mode, Smarter Enquiry Filters, and More Customisation Tools!
📢 Welcome to Shedmate’s August Release Notes! 🚀
This month’s update is all about helping you build smarter and grow faster. We’ve introduced powerful new tools to design with precision, track projects effortlessly, and manage user access with custom permissions.
Here’s what’s new in this release:
- ➖ Remove Bays in Awnings — simplify awning customization.
- ⚙️Company-Specific Engineerings — configure engineering rules to fit your business.
- 🚩Use Girts as Fascias — vary fascia styles to match your projects.
- 🏷 Shed Attributes — capture and manage more project details.
- 🔄 Conditional Pricing — automate pricing adjustments based on conditions.
- 📐Overall Shed Dimensions Types — easily tweak dimensions directly in Shedmate.
- 👀Shed Designer View-Only Access — share designs without editing rights.
- 💰Show/Hide Pricing — control how and when pricing is displayed.
- 🌞Skylight Cladding Selection — add more flexibility to your shed designs.
- 🔎Filter by Enquiry Drafts — find and manage drafts faster.
➖ New Feature: Removing Bays in Awnings
You now have full control over your awning design — with the ability to remove and restore bays directly from the Awnings tab in Shedmate.
👉 How it works:
- On each end bay of an awning, you’ll see a Delete button.
- Click it to instantly remove that bay.
- The button then changes to a gray Restore arrow.
- Click Restore to bring the bay back — along with any bays between it and the end of the awning.
A few things to know:
- If there’s only one bay left, the Delete option won’t appear.

- Any openings on a deleted bay will be removed.
- Openings on other bays will automatically adjust to stay aligned with the main shed.
Why this matters:
This gives you the flexibility to:
- Quickly customize awning layouts.
- Test different design variations with one click.
- Restore changes instantly without starting over.
⚙️ New Feature: Company-Specific Engineerings
Disclaimer – Company-Specific Engineering:
This feature is not available to all clients. It is designed only for:
-
Structural Steel subscribers, or
-
Companies that bring their own engineering rules and computations into Shedmate for quoting automation.
By default, all Shedmate projects use Shedmate Engineering.
Most customers will never need to set up Company-Specific Engineering. If you don’t have custom engineering rules in place, you should continue using Shedmate Engineering as normal.
About the feature: Now it’s easier than ever to set up custom engineering rules in Shedmate — and watching the system build your project’s computation tree feels almost magical!
Here’s how you can start:
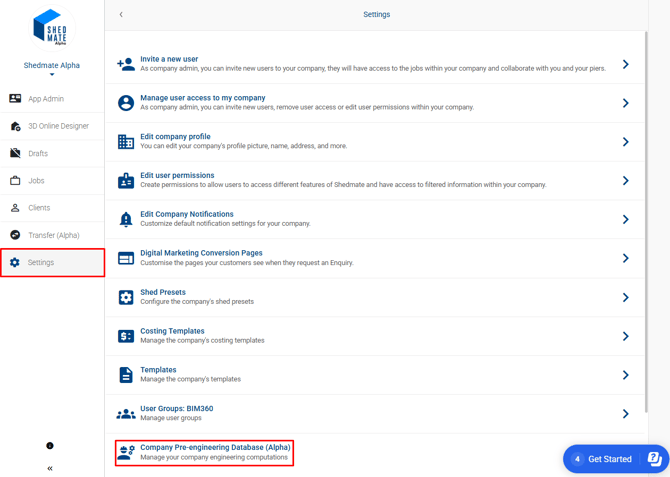
- Go to Settings in Shedmate.
- Open Company Pre-Engineering Database:
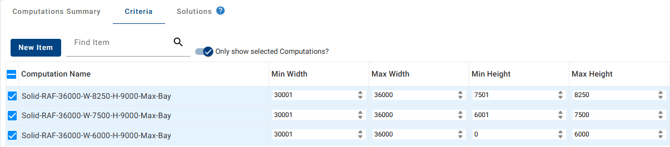
From there, every computation is built around two key elements:
- Criteria → All the important variables and ranges that guide the engineering analysis.
- Solutions → The safe structural frames that best match your chosen criteria.
💡 What’s new?
You can now edit and compare multiple criteria computations at the same time!
- Simply check more than one computation in the list.

- Click View Criteria to see them side by side.
- Make changes, compare values, and refine your setup all at once.
Extra tips for you:
- Duplicate criteria with one click, then tweak them to create quick comparisons.
- Test your new computations directly in the Shedmate 3D design environment to see results in action.
- Please note: you can open and compare multiple criteria, but not multiple solutions at once.
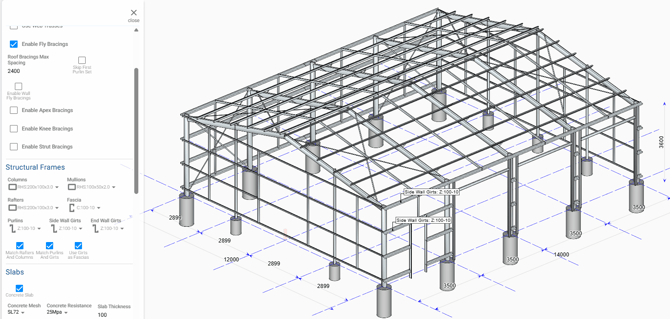
🚩 New Feature: Use girts as fascias
Shedmate just got more powerful! You can now switch fascia frame profiles between C and RHS frames—giving you greater control over design and structural customization.
And that’s not all: you can also use girts as fascias, opening up even more design possibilities for your sheds.
Check out the video: Use girts as fascias
✨ What’s New
- Switch fascia profiles – easily choose between C and RHS frame types.
- Use girts as fascias – apply the same girt type to your fascia for added flexibility.
- More customization, less hassle – design your sheds exactly the way you need.
How to Try It
- Open any project and select the fascia.

- From the options, choose your frame profile (C or RHS).

- To use girts as fascias:
-
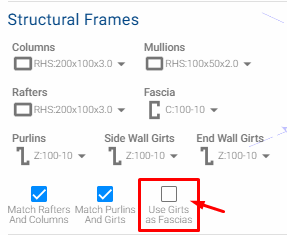
- Go to Structure Options → Structural Frames.

- Go to Structure Options → Structural Frames.
-
- Tick the box “Use girts as fascias”
-
- Now you will be able to check in the 3D design the changes:
🏷 New Feature: Shed Attributes
Shedmate now supports custom Attributes — giving you more flexibility to align Shedmate with your company’s unique needs. 🎉
Our team can configure these Attributes for you, and once set up, you’ll see them right inside the 3D Design environment.
Check out the video: New Feature: Shed Attributes
👉 To access:
- Open your project in 3D Design.
- Go to Settings.
- Look for Shed Attributes in the left-side menu.

Example categories you can set up:
- Structure Coating
- Ultra (Colourbond Cladding Colours)
Each attribute can include specific options and helpful tooltips to make selection simple and intuitive.
How this helps you
These custom Attributes can be used across Shedmate to:
- Improve pricing accuracy
- Support engineering analysis
- Streamline workflows in other Shedmate environments
Practical example:
Use Shed Attributes as variables in Instant Quoting to ensure faster, more tailored results.

🔄 New Feature: Conditional Pricing in Shedmate
You can now use Yes/No formulas in Shedmate — making your pricing smarter, more dynamic, and tailored to your project. 🙌
With Conditional Pricing, you can decide when items should or shouldn’t be included in your price calculations, all based on variables you define.
Check the video: New Feature: Conditional Pricing
👉 How to set it up:
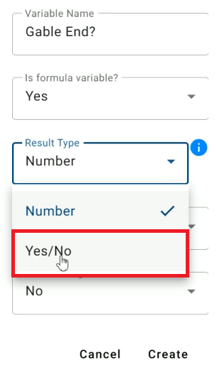
- Create a new variable.
- In the Result Type field, select Yes/No.
- This variable will now return either True or False.
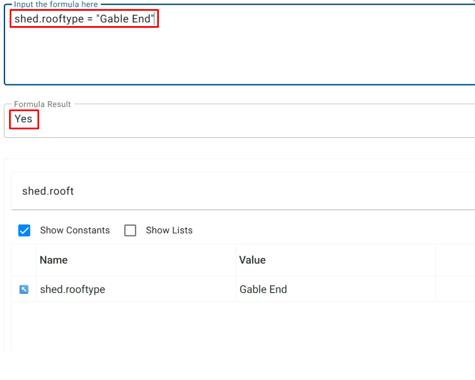
Example 1: Gable End Check
Want to know if your shed has a gable end?
- Create a simple formula.
- The Yes/No variable will return the answer instantly.
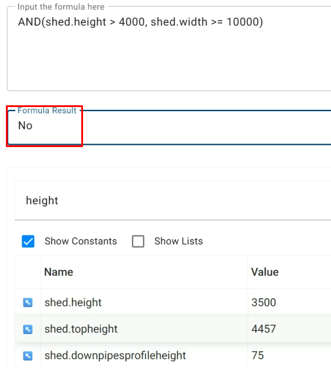
Example 2: Large Shed Check
Need to flag sheds above a certain size?
- Set conditions: Height > 4m AND Width ≥ 10m.
- The Yes/No result tells you if it qualifies as “big.”
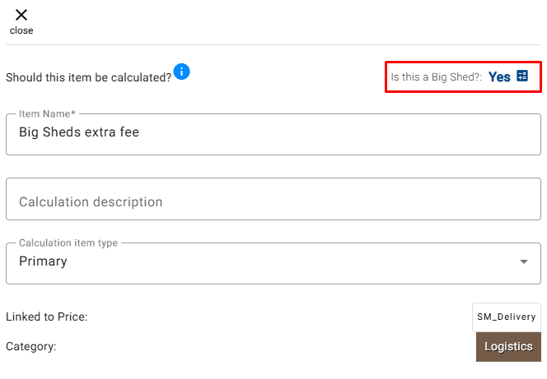
Put it into action in pricing:
- Go to Instant Quoting → Pricing Calculation.
- Open any item.
- At the top, you’ll now see a question: “Should this item be calculated?”
- Link it to your Yes/No variable — and your pricing will automatically adjust!
Why this matters:
Conditional Pricing gives you the power to:
- Apply rules for when items should be or not included.
- Automate complex pricing scenarios.
- Save time and reduce manual adjustments.
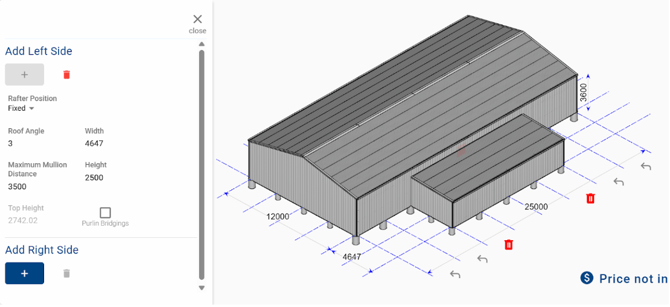
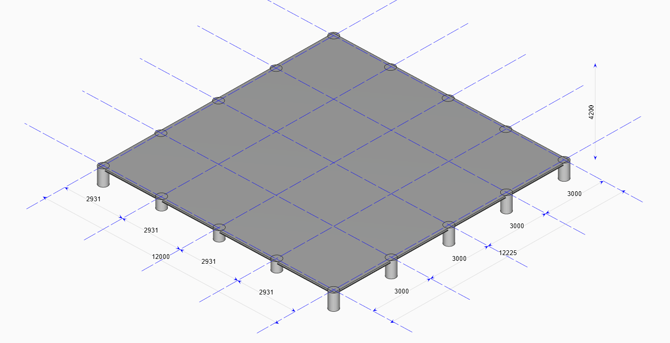
📐 New Feature: Overall Shed Dimensions Types
We’ve made it easier to control how slab dimensions are measured in your projects! Now you can choose the view that best fits your design needs:
- Slab Edges → Measures the slab from corner to corner.
- Grid Centers → Measures the distance between the external grid center lines.
Check the video below: New Feature: Dimensions Types
How to try it out:
- Open your project in the 3D Design environment.
- Go to Settings → the new Dimension Settings panel will appear on the left.
- Switch between Slab Edges and Grid Centers to instantly update your view.
Pro tip for better visualization:
- Change Shed Visibility to Show Engineering.

- Click on any frame in your model → choose Hide Structural Frames.

- Now you’ll clearly see only the concrete slab and footings with the updated dimensions:
Mix & match options
You can apply different dimension settings to Width vs. Length.
Example: use Slab Edges for Width and Grid Centers for Length
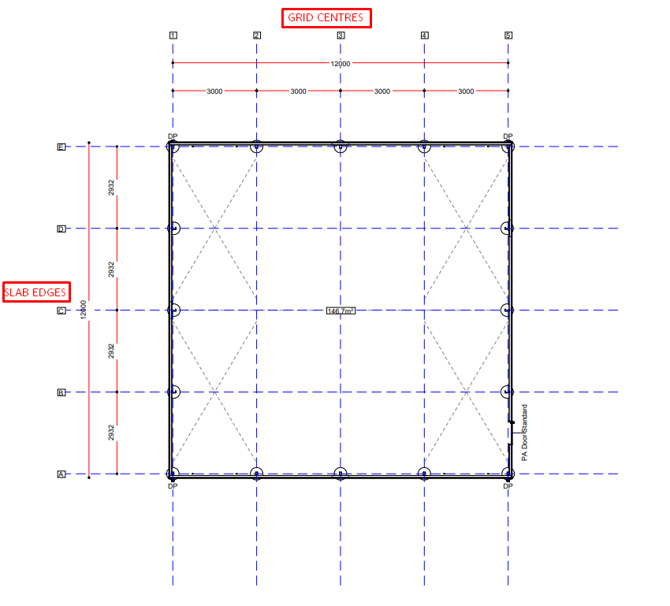
Plans that match your settings
Your chosen slab dimension settings are automatically reflected in your generated plans!
- Go to Export (top right corner in 3D Design).
- Select Architectural Plans

- Configure the page as you want and select → Go & Download.


- On Page 2 (Floor Plan View), you’ll see the slab dimensions exactly as you set them:
👀New Feature: Shed Designer View-Only Access
We’re excited to introduce a new View-Only permission level in Shedmate, giving your team more flexibility and control over how they collaborate in the Shed Designer.
With View-Only mode, you can now invite teammates to explore sheds without the risk of accidental edits. This is perfect for sharing designs with colleagues, managers, or customers who need visibility—but not editing power
What’s New
- View Access: Users can see Jobs and Drafts without making changes.
- View Only Jobs: Users can edit Drafts but only view Jobs.
- View Only Drafts: Users can edit Jobs but only view Drafts.
- No Access: Restrict Shed Designer completely.
How to Enable View-Only Access
To enable view-only access for a user, follow the steps below:
- Log in to your company account.
- Go to Settings → Edit User Permissions → New Permission (or Edit Permission).

- Scroll down to Shed Designer Permissions.Click More Info to see the new options.

4. Select the permission level that fits best.
5. Make sure the user’s Role is set to Regular User.
6. Apply the permission via Settings → Manage User Access to My Company → Select User → Set Permission.
🔒 Choose the Right Permission Level
When setting up a user, you’ll now see five permission levels for the Shed Designer:
- No Access – User cannot open the Shed Designer.
- View Access – User can view Jobs and Drafts in read-only mode.
- Edit Access – User has full editing rights.
- Jobs-Only View – User can fully edit Drafts, but Jobs are view-only.
- Drafts-Only View – User can fully edit Jobs, but Drafts are view-only.
How to Assign Permissions
To give a user one of these new permission levels:
- Ensure the user’s Role is set to Regular User.
- Go to Settings → Manage User Access to My Company.
- Select the user you want to update.
- Set their permission level under Shed Designer Permissions.

These are the options that are available for the user:

What Users See in View-Only Mode
When a user enters Shed Designer with View-Only access, they’ll get a simplified interface designed just for reviewing:
- View architectural, fabrication, and cladding details.
- Use tags and measurements without changing the shed.
- See shed pricing.
- Explore shed versions (view-only).
- Navigate, select, and hide elements—without editing.

💰New Feature: Show/Hide Pricing
You asked—we listened! Now in Shedmate, you can easily toggle pricing on or off during presentations. This means you can confidently showcase your sheds to clients without revealing costs until the right moment.
No more distractions. No more accidental pricing reveals. Just a smooth, professional experience every time you present.
Why You’ll Love It
- Hide pricing when sharing designs with clients.
- Show pricing instantly when you’re ready to discuss numbers.
- Stay in control: Once hidden, pricing stays hidden across all sheds until you turn it back on.
How to Use It
- Open any shed.
- Click the visibility button.
- Instantly Show/Hide Pricing with a single click.

🌞 New Feature: Skylight Cladding Selection
Designing just got more flexible! You can now select from different skylight cladding layouts directly in Shedmate. With just a couple of clicks, you can explore styles and choose the option that best fits your shed design.
Why You’ll Love It
- More design flexibility – match skylight cladding to your project needs.
- Easy to use – simply select a skylight, then pick the profile you want.
- Tailored to you – request to add or remove cladding options for your company.
How to Try It
- Select a skylight in your shed design.
- Open the Profile Options.
- Choose your preferred Cladding Type.

🔎 New: Filter by Enquiry Drafts
Managing drafts just got easier! You can now filter enquiries to show only draft items with a single click. This makes it faster than ever to focus on the work in progress without distractions.
Why You’ll Love It
- Work smarter – instantly see just your drafts.
- Stay organized – keep your workspace clear and focused.
- Save time – no more scrolling through completed items when you only need drafts.
How to Use It
- Open the Enquiry Drafts listing page.
- Click Filters (top-right, next to the search bar).
- Toggle Only Draft Items.
- Your list will refresh to show draft enquiries only.

Let’s Build the Future of Sheds—Together! 🛠️💥
Your Shedmate Team
P.S. Got feedback? We’re all ears! Chat with our support team (support@shedmate.com.au). 💌